Sabiki Rig (Also know as a Spanish Mackerel Rig)

The Sabiki (Spanish) Rig
The Sabiki Rig is basically a series of hooks tied to a main line. Usually anywhere from 6 to 10 hooks tied in a series with some sort of flash material on the hooks. Many Sabiki rigs are available for purchase at sporting good stores but most are very light weight with maybe a 6# test line and very small hooks. Most of these are used for catching small bait fish. Don't even try to catch a blue Fish, Spanish Mackerel, or Florida Pompano on these small light weight rigs. You will realize quickly that they will be useless as they will break almost instantly and not only do you not catch your fish but you will be throwing away your money.
Although some pier tackle shops offer heavier duty Sabiki Rigs for sale they can get pricey. I have seen anywhere from $8 to $10 per rig and if you consider that you may lose a rig on the first catch that can add up fast.
Below are instructions on how you can make your own rigs. However if you want to purchase them already made go to my PRODUCTS page.
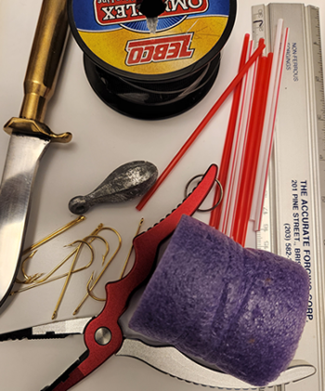
Making your own Sabiki Rig. Gather Materials
Making your own Sabiki Rig is no great mystery. All it takes is a little knowledge and some practice. Gather the following items:
- 40lb test clear monofilament line. I recommend that you do not use colored monofilament.
- 3oz. bank sinkers. I have found that the 3oz is the most practical. 2oz won't sink fast enough. 4oz is good when wind is high.
- A swivel (Recommended but not required) A swivel instead of just a loop helps prevent the line from breaking there.
- colored drinking straws. (Regular or sipping straws. Red and red & white are the most popular)
- #3/0 Gold Aberdeen fish hooks. You can order them here.
- A pool noodle. You can find them at the local $1.25 store. You only need one to start.
- A knife to cut the pool noodle with.
- Pliers. Fishing pliers are best but any pliers will do. With fishing pliers you can skip item 9.
- Scissors or a nail clipper to cut the monofilament.
- A ruler. (optional but makes it easier to measure the distance between hooks.)

Tying the Rig
1. Cut the straws the length of the hook's shaft and pass the shaft through the straws. Red and red & white straws seem to be the most popular but any color should do as you are just trying to add color and flash to attract the fish. To make it easier to cut the straws or tubing we are now offering our straw cutter which can measure and cut them at proper length. See Them Here.
2. Tie a swivel to the end of the monofilament line. You can just tie a loop to the end of the line instead but I recommend using a swivel. It will help prevent the line from breaking at that point.
3. Measure out about 10" to 11" of line and form a small loop. With your pliers pinch the loop so that the loop will easily go through the eye of the hook. This is where you will tie the first hook and straw assembly. Slip the pinched line through the hooks eye forming a loop long enough to go around the hook end of the fishing hook and pull tight. Always be careful when handling hooks they are very sharp and if the sink in your finger beyond the barb they will be very difficult and painful to remove. Don't worry that pinching the line will weaken it. Chance are good that you will lose the rig by a shark, a ray or by the line fraying as your catching those toothy fish long before the line breaks at the pinch point.
4. I use a special loop knot to tie off the hook at this point but it is difficult to explain. So just use a double overhand knot to tie off the hook about 1-1/2" from the eye. Tighten the knot so that the knot won't slip down to the eye of the hook. Now this is what I and some others do. Some "store bought" rigs will have the knot all the way to the eye of the hook. That makes it easier to tie a knot but I prefer not to have the hook that close to the main line. I tie 7 hooks on my Sabiki Rig. There is nothing magical about 7 hooks. I just find that 7 works best for me.
5. Press the hook and barb end of the fishing hook into the pool noodle. This will keep the sharp pointed end out of your way as you continue to tie on hooks. I find it best to keep the first hook close to the end of the noodle and then push each additional hook next to the first one and so on. As you place the hooks, wrap the line around the noodle. If you wrap the line from each hook the same way it makes it easy to unravel the hooks one by one.
6. Measure about 10" from the knot to where you will form another small loop and pinch it just as you did in step 3 above. Continue the procedure outlined in step 3 through step 5 and continue doing the same until you have 7 hooks tied into the line. After you have tied the 7th hook and buried the pointed end into the pool noodle measure out about 11" and cut the line at that point.
7. Tie on your 3oz bank sinker to the end of the line in any manner you wish. You have made your first Sabiki Rig at about a cost of about $2.95 or less. You can continue making your own or for about $8.00 each you can buy them ready made. The choice is yours.
I did not use monofilament when taking these photographs. I needed a dark line so that it would show more clarity. I highly recommend using clear monofilament. If you are tempted to use braid, the first time a fish tangles your line you will realize why I strongly recommended monofilament.